We’re Over Here!
By Pete Nawrocky
Using surface marker buoys safely and effectively
Note: This article is designed to offer tips for better deployment of surface marker buoys from depth. This is a skill that should be practiced under the guidance of a qualified instructor.
Surface marker buoys (SMBs) are designed to be inflated at depth and sent to the surface at the end of a line. By inflating an SMB at depth a dive team marks their position at the beginning of their ascent, allowing them to perform a safety stop or required decompression while the boat maneuvers into position. In theory, this minimizes the amount time divers must spend on the surface waiting to be picked up and maximizes their visibility — and thus, safety.
Divers generally deploy SMBs while neutrally buoyant in the water column, so they must take care not to drop the reel or finger spool, which may be negatively buoyant. There should be at least 50 percent more line on the reel than the depth from which the SMB is being deployed. Before deploying an SMB, look up to make sure the boat hasn’t already found you or that a group of divers isn’t directly overhead. A tiny puff of gas is generally sufficient to keep an SMB upright and makes it easier to manage by preventing it from ascending too quickly.
Some SMBs have overpressure valves (OPVs), which relieve pressure as the buoy ascends and the gas inside it expands. OPVs are generally one-way valves that won’t dump gas once the SMB is on the surface. SMBs with open bottoms do not require OPVs; however, these will dump air if they fall over.
Some divers use a dedicated low-pressure hose with an air tool attachment, but this equipment is probably unnecessary unless you plan to inflate an SMB or a lift bag on every dive. Aside from this dedicated piece of gear there are three basic methods for inflating SMBs, and each has its pros and cons. Whichever technique you choose will require training and practice. Be neutrally buoyant and well trimmed before you begin.
Inflate the bag by exhaling into the opening. Without removing your regulator, turn your head to direct exhaled bubbles into the SMB’s opening. There is a risk of the line tangling in the regulator and pulling it from your mouth. It may be challenging to get enough gas into the SMB to keep it fully inflated on the surface, but there is little chance of the regulator free flowing, and not much gas should be wasted. This technique requires the SMB to be very close to the diver’s face and thus may limit vision.
Use your alternate air source. This technique can deliver a large amount of gas into the SMB quickly, but there is a risk of free flow. Since SMBs are usually sent to the surface near the end of dives, excessive loss of breathing gas may be problematic. It is important to secure the alternate air source once the SMB is on its way to the surface to reduce the risk of entanglement of the line around the second stage. Divers should not use their primary second-stage to inflate an SMB, because a problem during deployment could leave the diver without readily available breathing gas.
Use your BCD’s power inflator. This method will work only if you use a standard inflator; a unit with a built-in alternate air source may be too large to use. Grasp the power inflator, and place it in the SMB, keeping the inflator higher than the BCD’s air bladder(s). Press the inflate and deflate buttons at the same time. This will inflate the SMB quickly, there is little risk of free flow, and the breathing cycle will not be uninterrupted. This method should not affect buoyancy, but if it does the solution is in the diver’s grasp. It is also unlikely to cause entanglement, and there is nothing to reset or replace afterward.
Once the SMB starts its ascent, the reel or finger spool will unwind rapidly; do not allow the line to leave the reel so fast that it creates loops or causes a backlash or a jam. Keep the reel in front of you so you can manage it easily — don’t imitate a subway-strap hanger. Use your free hand as a brake or drag. As soon as the line stops, reel in the slack, and maintain tension. This will keep the SMB upright and give it a better chance of being seen. If you’re using an open-bottom SMB, reel in the slack quickly so the buoy doesn’t dump air and sink. If the SMB can be seen from depth and most of it is still underwater, it will be difficult to spot on the surface. To ensure the SMB stays upright, maintain tension on the line by reeling it in as you ascend.
As you deploy the SMB, your buddy should keep an eye on you and have a cutting tool handy; this minimizes the risk of being dragged to the surface in the event of entanglement. He or she should also monitor the depth. Finally, if added visibility is warranted, your buddy may clip a second SMB to the same line and send it to the surface.
Shooting an SMB is an essential skill for technical divers, those who dive offshore or in current and any divers who might need to mark their location. Pick a method of deployment that works for you, and practice, practice, practice.
The Reel Deal
By Brian Wake
Here are some tips for preparing a new reel for use.
Tie off the end of the line, and let it out to its full length. Check the line for snags, breaks and defects.
Use a permanent black marker to make a quarter-inch-wide mark on the line every 10 feet. This will help you monitor your depth as you ascend.
At 15 feet from the end of the line, use a red marker to mark every foot for five feet, establishing a safety-stop zone between 15 and 20 feet.
Rewind the line while maintaining tension to ensure it does not catch or snag.
Use a permanent marker to identify your reel; many reels look alike.
Periodically unwind and rewind your reel to make sure the line has not been damaged, especially if you lend it to someone. It is better to replace a damaged line than to try to make a repair. Routine maintenance will give you confidence that the reel will function properly when you need it.
© Alert Diver — Spring 2014
Gear
Nautilus Lifeline
A Clear Picture
Nitrox
Get Wet, Dive Dry
Breathe In, Breathe Out
Defining Performance
ADVERTISEMENT
– See more at: http://www.alertdiver.com/OverHere#sthash.GRwJnn0w.dpuf
PADI ecard
PADI eCard™
You might forget your wallet and you might forget your certification card but you always bring your phone. With the PADI eCard, you can verify your dive certification using your mobile device and leave your plastic certification cards at home. Now you can show off on the dive boat with all your certifications in one place or quickly verify your certifications with dive centers, resorts or instructors around the world – all from your mobile device.
Before you purchase your eCard(s), make sure you:
– Have a mobile device running Apple iOS 3.x (or higher), Android 1.6 (or higher), Blackberry OS 4.5 or 5, Symbian 9.2 (or higher) and Symbian Belle.
– Download the latest version of the PADI App
Just how big is the ocean?
a quick video if thinking about doing macro photography underwater.
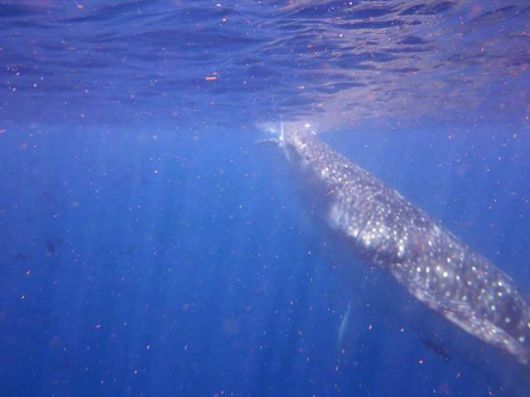
Our whaleshark
Roatan Triop 2013
Just back from Roatan, what a great time. We stayed at Turquoise Bay Resort on the northeast side of the island. Beautiful sand beach, staff that would come out and get your drink order, what more can a person ask for on vacation. What a great place, great staff and rooms were all very nice, and the food was terrific. We had local entertainment almost every night from fire dancers, local music and then a band on the last night so everyone cut loose and was dancing up a storm. We gave away lots of gifts and even had some very clever entries made by some. Those will remain in my heart for a long time.
Diving was great, beautiful walls, nice swim through and abundant fish. I always try and find something that I haven’t seen before and I was not disappointed. A Glassy Sweeper, rainbow runner, cave bass, bluelip parrotfish and the ultimate on a dive trip that not everyone gets to see and that is of course the Whaleshark. We felt that we were in a roundup herding cattle. All the boats were surrounding this yet unseen creature. We saw all the tuna, it looked like a bubbling pot at Yellowstone Park. There were hundreds of them in a bait ball, then we all got close enough to see him come to the surface – a great side view of him. No one was really thinking cameras, just getting mask, snorkel and fins on so that we could jump in water and get a real close look. So as we all got geared up and jumped in and swimming mid ocean, no where close to the reef, here is about 20 people all leaving the comforts of the boat and off we go on that swim of a lifetime. Some of us realized that we were no longer on a reef and now very far from the boat in all directions, but the whale shark was worth it. As we all got close to seeing him up close and personal, he took a dive and left us. So even though we didn’t get to see him like pictures portray them, we still all had the excitement of seeing just his side and tail above the water. Many people have dove more that 40 years without seeing one, so we were very lucky to just see what we did. Everyone on the boats were so excited all week that it is a day that will not be forgotten anytime soon.
Hard Time Clearing your ears, Check this article out!
The Healthy Diver: Tips for Clearing Your Ears

Ear woes are the No. 1 reason divers pull the plug on a dive, and in extreme cases, the sport itself. But with a few tricks and advanced techniques, almost anyone can make equalizing easier. In diving, the Valsalva maneuver is often used on descent to equalise the pressure in the middle ear to the ambient pressure. Performed properly — pinching your nose shut while exhaling — most divers can descend without any problems. But for some divers, the technique doesn’t help.
You should never continue with a descent if you are experiencing ear pain. But before you give up on a dive — or diving itself — try these tips.
Listen for the “pop.” Before you even board the boat, make sure that when you swallow you hear a “pop” in both ears. This tells you both eustachian tubes are opening.
Start early. Several hours before the dive, begin gently equalizing your ears every few minutes. Chewing gum seems to help because it makes you swallow often.
Equalize at the surface. “Prepressurizing” at the surface helps most divers get past the critical first few feet of descent. It may also inflate your eustachian tubes so they are slightly bigger. Not all medical authorities recommend this, however. The lesson here is to pre-pressurize only if it seems to help you, and to pressurize gently.
Descend feet first. Studies have shown a Valsalva maneuver requires 50 percent more force when you’re in a head-down position than head-up.
Look up. Extending your neck tends to open your eustachian tubes.
Use a descent line. Pulling yourself down an anchor or mooring line helps control your descent rate more accurately. A line also helps you stop your descent quickly if you feel pressure.
Stay ahead. Equalize often, trying to maintain a slight positive pressure in your middle ears. Don’t wait until you feel pressure or pain.
Stop if it hurts. Your eustachian tubes are probably locked shut by pressure differential. Ascend a few feet and try equalizing again.
Avoid milk. Some foods, including milk, can increase your mucus production.
Avoid tobacco and alcohol. Both tobacco smoke and alcohol irritate your mucus membranes, promoting more mucus that can block your eustachian tubes.
Keep your mask clear. Water up your nose can irritate your mucus membranes, which then produce more of the stuff that clogs.
Alternative Clearing Techniques
There are problems with the traditional Valsalva maneuver: It may not work if the tubes are already locked by a pressure differential, and it’s all too easy to blow hard enough to damage something. Divers who experience difficulty equalizing may find it helpful to master some alternative techniques.
Toynbee Maneuver. With your nostrils pinched or blocked against your mask skirt, swallow. Swallowing pulls open your eustachian tubes while the movement of your tongue, with your nose closed, compresses air against them.
Lowry Technique. A combination of Valsalva and Toynbee: while closing your nostrils, blow and swallow at the same time.
Edmonds Technique. While tensing the soft palate and throat muscles and pushing the jaw forward and down, do a Valsalva Maneuver.
Frenzel Maneuver. Close your nostrils, and close the back of your throat as if straining to lift a weight. Then make the sound of the letter “K.” This forces the back of your tongue upwards, compressing air against the openings of your eustachian tubes.
Voluntary Tubal Opening. Tense the muscles of the soft palate and the throat while pushing the jaw forward and down as if starting to yawn. These muscles pull the eustachian tubes open. This requires a lot of practice, but some divers can learn to control those muscles and hold their tubes open for continuous equalization.
